


 First Step: Hop into a photobooth. Make sure to include props or signs to relay your message to your guests. Have fun with it! As you can see, it takes a few tries to get it just right. We were fortunate to be able to work with Image Cinema (the photobooth company in our town). If there isn't a photobooth in your area, take several shots with a digital camera. Then, load them onto Pixlr Express...under "collage" they have a photobooth strip design where you can upload your images. They also have really cool photo editing tools too. Love, Love.
 What you'll need: 2 different colors of cardstock (we used purple and kraft for our actual save the dates), paper cutter, corner rounder and scrapbooking tape, such as glue dots (I forgot to add it in the photograph).
 1) Select which colored cardstock you'd like for the background of your save the date. Cut paper 8.75" x 3.5" using paper cutter. 2) Select a colored cardstock for the front of your save the date. Cut paper 8.25 x 3" using paper cutter. 3) Lay your front piece of cardstock (8.25" x 3") onto your back piece of cardstock (8.75" x 3.5"). Make sure you like the border distance. Also check to make sure your photobooth strip fits properly.
 4) Take your corner-rounding-scrapbooking-thingy-ma-bobber. I used "Crop-A-Dile Corner Chomper", which I absolutly LOVE!!! More about that later. 5) Select your angle...I cut mine using a 1/2" angle. 6) Round each corner. With the "Crop-A-Dile" you can cut multiple sheets of paper at a time. 7) Complete all corners with the 8.25" x 3" & 8.75" x 3.5" papers.
 8) Use scrapbooking tape on back side of 8.25" x 3" paper. We used Elmer's glue dots...one in each corner and 2 in the center of the paper 9) Center and firmly press 8.25" x 3" paper onto front of 8.75" x 3.5" paper. 10) Use scrapbooking tape on back side of photobooth strip. You can substitute the scrapbook tape for photo corners, as shown below. 11) Center and firmly press photobooth strip onto front of 8.75" x 3.5" paper.
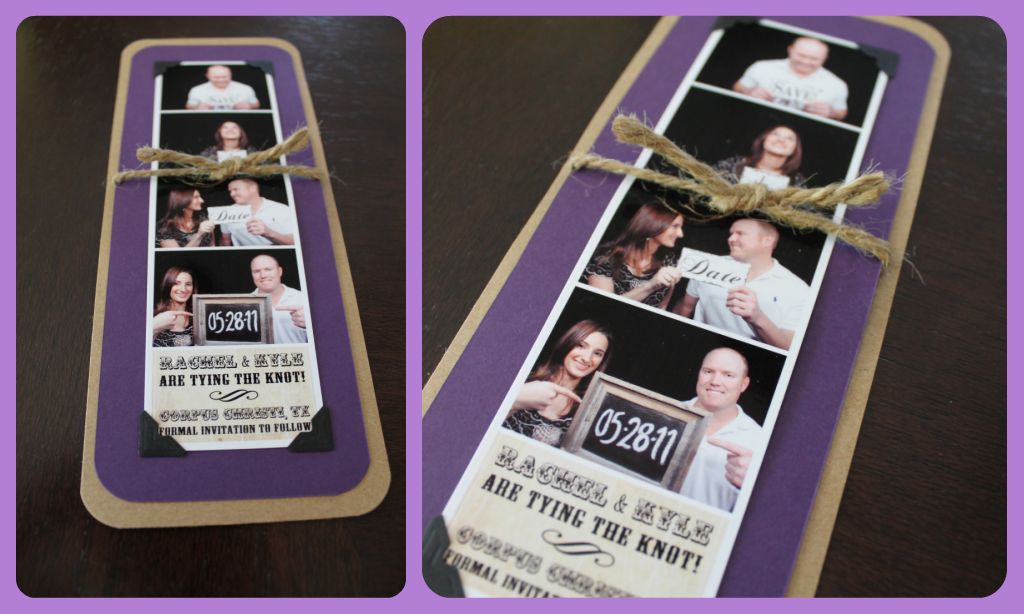 {Th Finished Product}
Embellish your Save-the-Dates with ribbon, buttons, etc...skies the limit! We used photo corners and twine to go along with our "tying the knot" slogan. We also decided upon purple and kraft paper, all purchased at Hobby Lobby (the paper source - 50 sheets for $3.99)
 Finally, select an envelope of your liking. We used 8.875" x 3.875" envelopes in kraft from Hobby Lobby (the paper studio - 25 for $4.99). If you get them from HL wait until their scrapbooking supplies go on sale (50% off about once a month). HL also has a great app for your smart phone! They have a "40% off any 1 item" coupon you can use daily.
 Now they're ready to ship! We decided to print out address labels instead of hand writing them. **FYI** Have the USPS weigh them for proper postage. Our's took extra postage.
No comments:
Post a Comment